- Secure order
- Easy return shipment
- Service-Hotline +41 71 511 23 70
Instructions No. 3341
The stencilling technique is a tried-and-tested method for transferring motifs quickly and easily without the risk of freehand painting. Whether on boxes, stretched canvas or walls - it stenciling is versatile and easy to master. In this Article you will find useful tips and learn more about the creative uses of stencils.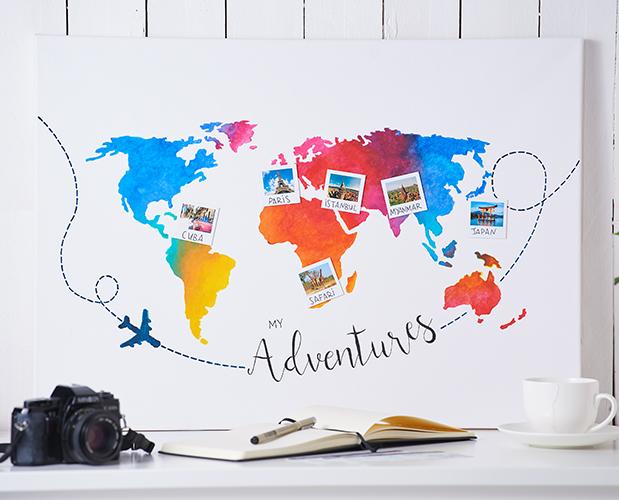
Stencils are particularly popular for wall design. You can quickly give your home an individual touch. But furniture, stretched canvas and paper crafts also benefit from this technique. Stencils not only offer only beginners confidence, but also inspire experienced creatives. Visit our VBS craft store to discover high-quality stencils made from washable and durable plastic.
1. Tip - Choose the right color
Use thick paints for the stenciling to avoid bleeding. Acrylic paints are ideal as they are blendable, highly opaque and lightfast.
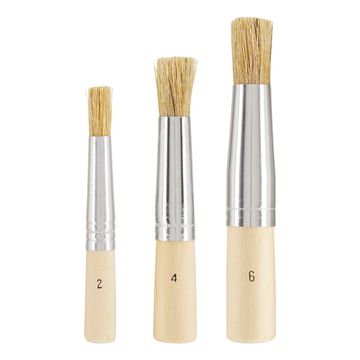
2. Tip - Use stencilling brushes
Real stencilling brush es have short bristles that are cut straight. They dab filigree motifs without bringing paint under the stencil . Incidentally, stencilling brushes are also better suited for grading several colors within a motif. This is mainly because stenciling involves dabbing rather than painting (see tip 8).
3. Tip - Don't forget the painting palette
To avoid using too much paint, use painting palettes or cups. This way, you can simply dab off excess paint and achieve a perfect result.
4. Tip - Self-adhesive stencils?
When buying, make sure that your stencils are self-adhesive. These adhere to various surfaces, but are not suitable for mirror-inverted motifs.
5. Tip - adhesive spray holds the stencil in place
An adhesive spray ensures that the stencil does not slip. It is easy to remove or wash off and makes your work easier.
6. Tip - Clean surface
Before you start, make sure that your surface is clean and free of grease or dirt to ensure the best possible result.
7. Tip - Guide lines for borders and patterns
Use pencil lines or taut threads to help you to apply templates for borders evenly. Mark end points for even spacing.
8. Tip - Dabbing instead of painting
Dab the paint on with little pressure from the inside out. Avoid stroking movements to achieve clear contours.
9. Tip - Achieve interesting effects with the sponge

An alternative method is to use sponges. Stippling brushes create very even motifs thanks to their fine-pored sponge.
10. Tip - Think positive and negative
Stencils can be used negatively (between the stencils) or positively (directly on the stencil). As a negative, simply place stencil on top and dab the spaces in between with paint. Or you can stamp with the stencils by applying the paint directly to the stencil and pressing it onto the surface. This technique opens up amazing design possibilities.

11. Tip - Keep the stencil clean
Don't forget to clean your stencil regularly to prevent unwanted paint residue when you reapply it.
12. Tip - Spray bottle technique
Great effects can be achieved with a spray bottle and diluted stenciling ink A fashion spray and stencils can be used to creatively design textiles.

13. Tip - letter stencils
Letter stencils offer endless creative possibilities. Experiment with different fonts and create unique lettering.

14. Tip - stenciling on glass
Stencils on glass are particularly beautiful. With window paints, motifs can be used again and again, ideal for seasonal decoration.
15. Tip - Add some sparkle to your stencilling idea
With leaf metal creates shiny accents. Apply gold leaf priming milk like a stencil and apply the leaf metal with a brush. Messy edges can simply be plucked away here.
16. Tip - Three-dimensional stencilling
Use structure pasteto create three-dimensional effects. Instead of paint, use a spatula, to make your creations three-dimensional.
17. Tip - Make your own stencils
Create individual stencils from lamp foil. Cut out your own motifs with a cutter knife and enjoy the durability of the film.
18. Tip - Still missing a brilliant idea for stenciling?
Try this world map. The possibilities offered by this world map are impressive and provide many creative options.
Have fun with stenciling! 
Visit our VBS craft store now and get all the materials you need for your next stencilling project!